Showing posts with label tutorials. Show all posts

Sunday, January 3, 2010

How To Make Feather Earrings


Feather earrings are the newest trend. I'm starting to see them everywhere - and why not? They're a great way to add some flair.

And the best part? They're easy to make, and feathers are cheap, cheap, cheap!

You will need:


A special kind of crimp (see above) - the kind used on the ends of cotton cord. I'll update with a link to a site where you can buy these.

Feathers

Earring wires or clips

Needlenose pliers

Scissors


Step One: Put together the feathers


Find a combination of feathers you like, and make sure you have enough similar feathers to make a double of it.


Step Two: Crimp It


Holding the feathers firmly, place the open crimp at the top of the feathers. Make sure that all the stems are in the crimp, and that none stick out the end. If you need to trim the ends with scissors to achieve this, do so.


Making sure that the feathers don't shift away from where you want them, fold one side of the crimp in and over the stems with needle-nosed pliers, pressing firmly. Then fold the other side of the crimp over as well.


Step Three: Repeat.

Do the same thing all over again to create the second earring.


Step Four: Attach ear wires.

This is pretty basic... just remember to twist open the earring loops and you should be fine. Make sure the front of the feathers is facing the right direction.

Et Voila!

Obviously, I didn't follow my own advice about making sure you have enough of the same type of feathers.

Enjoy!

This is the easy & quick way to make these earrings. There's another way that looks better but requires more work. I'll be posting a tutorial with that method soon.

Saturday, January 2, 2010

Great White Balance Tutorial

Just a quick post to share something really useful...


I found this awesome tutorial on finding the correct white balance in camera every time - essential for taking good product photos. Thanks to COLOURLovers for turning me on to it!


Great advice, simple to implement. Hope you find it useful!


Wednesday, December 30, 2009

New Year's Resolutions


It has been months since I've updated this blog. All my good intentions and grand schemes seem to have flown out the window. I am ashamed and shocked at myself for not even having blogged about the stuff I received in the Shop Swap & Blog. I am a horrible person.

So, first thing after new years, I am not only going to be blogging about the fantastical things that were sent to me (I shudder to think of how long ago), I am also going to do features of my two fabulous, patient, understanding swap partners' amazing etsy shops.

Also on the New Year's Resolution list, next to the traditional "exercise more" and "eat healthier": one tutorial per week. Lately I've been fascinated with fascinators. I made my first ever just a few days ago, and soon I'm going to show you all how to make them too.

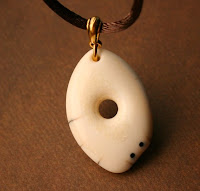
I met a very nice local sculptor who is carving pendants and wanted to sell them to raise interest in his sculptures, so naturally enough, I am now managing his etsy site for him, taking product photos, listing items, and handling shipping. And the pendants - and I would say this even if I wasn't getting a commission for selling them - are gorgeous. The shop started at the beginning of December. We had 6 sales within 5 days.


I'm also designing and managing his new website for him, which is really working out nicely. Not only have I figured out a trick that can get him 50% off web hosting costs with my web host, which genuinely gives him the most and best services for his money, I get $60 for referring him. I kind of want to do a tutorial on this, but I get the feeling that could just be really tacky.

If you're interested, the sculptor guy's website (made by yours truly) is www.naulaq.com. He's truly a very talented artist.

Wednesday, September 23, 2009

How to Make Action Figures Into Charms


Ok, this isn't what I planned to write for my next tutorial, but I'm putting a bunch of ninja earrings and necklaces in my shop very soon, so I figured I might as well photograph the process and make it a tutorial!

You will need:
  • A thumbtack
  • A headpin
  • A small action figure, probably rubber or a plastic that isn't too hard or brittle.
  • Glue, if your action figure isn't rubber.
  • Jewelry pliers - it doesn't really matter which kind, even crimping pliers would probably work.


Step One: Get your ninja!


I'm using ninjas in this tutorial... I have them in 8 different colors and 12 different poses. LOL.

Step Two: Find the center of the ninja's head.

You want to find the point that's above the neck, because you want the hole we're going to be poked to poke down into the neck and not to come out under his chin.


Step Three: Poke Him!


Step Four: Poke him again! This time with the headpin. You might need to trim the headpin down a little.

Push the pin in with the pliers.

Step Five: Voila! Admire your new pendant or charm.


If your action figure wasn't made of rubber, which will tighten down over the headpin, glue the headpin in.

This also works great with those cute Japanese erasers!


And the little pop-top containers from the 25-cent machines that the ninjas come in are great packaging for small items!

These are a pair of earrings I just made that I will be listing on the shop as soon as possible. There's a matching ring, too! =D

Monday, September 21, 2009

Upcycled Envelope Tutorials (by other crafters)

Tonight I decided that before writing up my tutorial on making envelopes, mailers, and more from the book pages, I ought to check out what others have done that is similar. WOW! There are so many great and different ideas out there on how to make upcycled mailers and envelopes!

I'm still going to write my own tutorial, because I'm sure I'll do a few things differently, but I'll read the tutorials others have written first and if I come across any useful tricks, or if I think up any of my own, I can include those in my tutorial... giving credit where credit is due for other people's tricks, of course.

In the meantime, you really should check some of these out!

Treehugger features several eco-friendly mailer creations from a variety of materials.

Team EcoEtsy shows how to make a waterproof brown paper mailer from old grocery bags!

Whosies has a similar tutorial using contractor's paper.

Trans-Canada Etsy Team
shows how to make mailers from old cereal boxes on their blog!

And finally, 27 Things has a tutorial for DIY bubble mailers that are just beautiful!

Glancing over these, I can see how my ideas are different enough to warrant writing a tutorial or two of my own. So go out and read these, but be sure to check back here to see my own spin on it! =)

Sunday, September 20, 2009

Die Cuts and Yard Sales

Every time I drive into town on the weekends, I pass at least five different signs for yard sales. It's torture! I can just imagine all the broken watches I could take apart and use in steampunk jewelry, or the old books with colorful pages, or interesting jewelry I could take apart, just waiting to be discovered... AND I HAVE NO MONEY!

So go buy something from my shop, before garage sale season is over! LOL.

Aaaand now... as promised... examples of what you can do with book pages!

I went to the local Ben Franklin craft store today... they have two different die-cutting setups, and I make good use of them. =) Here's what I made today...

Over 20 small envelopes like these:


And a lot of these adorable little heart boxes - the PERFECT size for the rings I make!

Saturday, September 19, 2009

How to Take Apart a Book Without Ripping the Pages

This may not seem like the most useful skill right now, but just wait until I put up all the different things you can make with these pages - you won't want to lose a centimeter of the paper to ripping!

Ok, so first step... You Will Need:

A book you no longer want to read
and
A knife. A craft knife is probably best but a kitchen knife will work too... just any knife that's handy.

You can use any type of book, because of course thin paper book pages are useful for decoupage and other crafts, but in this tutorial and others I will be using a book with large, thick, shiny pages... a coffee-table book, essentially.

Ok. If you want to know how to take apart a book, you need to know how it's put together.

If you look at any book that's actually bound, and not just stapled together, and look closely at the paper where it meets the spine, you will see little groups of pages folded in half.

When a book is bound, a certain amount of pages are stacked, sewn down the middle, and folded in half. Then these packets are glued into the spine.

In this picture, the pages on the left have had the insides of the packets removed, leaving only the outer page of the packets, which is glued to the spine.

So step one is to find the packets in your book!

Once you do find a packet, find the inside pages of the packet - the ones not glued to the spine.


Open the book to the front or back of this inner packet, so that one of the pages you're looking at is the one glued to the spine, and one of them is the front or back page of the inner packet.


Taking your knife, run it along the crease where the pages meet.


This will cut the threads that hold the inner packet to the outer pages. It may help if you grip the inner packet and pull with one hand and use the knife with the other. I'd show this in my pictures but I'm using the other hand to hold the camera, lol.


Soon you should be able to pull the inner packet away. Open the inner packet.


The pages in the packet should come apart very easily, as the threads holding them together have already been cut.


Et voila! Beautiful, unripped pages twice as big as if you'd ripped them out!

Coming up next... what the heck to do with them!

Tuesday, September 15, 2009

Coming Soon

Ok, we're up and running!

Coming soon:

Tutorials...
~ How to take apart a book without tearing the pages
~ Make your own upcycled bubble mailers! (guess what from)

Etsy Listing Tips...
~ Editing product photos without fancy software
~ Lighting and the Evils of Flash

And more! So stay tuned~

Pepper