Wednesday, December 30, 2009

New Year's Resolutions


It has been months since I've updated this blog. All my good intentions and grand schemes seem to have flown out the window. I am ashamed and shocked at myself for not even having blogged about the stuff I received in the Shop Swap & Blog. I am a horrible person.

So, first thing after new years, I am not only going to be blogging about the fantastical things that were sent to me (I shudder to think of how long ago), I am also going to do features of my two fabulous, patient, understanding swap partners' amazing etsy shops.

Also on the New Year's Resolution list, next to the traditional "exercise more" and "eat healthier": one tutorial per week. Lately I've been fascinated with fascinators. I made my first ever just a few days ago, and soon I'm going to show you all how to make them too.

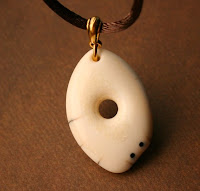
I met a very nice local sculptor who is carving pendants and wanted to sell them to raise interest in his sculptures, so naturally enough, I am now managing his etsy site for him, taking product photos, listing items, and handling shipping. And the pendants - and I would say this even if I wasn't getting a commission for selling them - are gorgeous. The shop started at the beginning of December. We had 6 sales within 5 days.


I'm also designing and managing his new website for him, which is really working out nicely. Not only have I figured out a trick that can get him 50% off web hosting costs with my web host, which genuinely gives him the most and best services for his money, I get $60 for referring him. I kind of want to do a tutorial on this, but I get the feeling that could just be really tacky.

If you're interested, the sculptor guy's website (made by yours truly) is www.naulaq.com. He's truly a very talented artist.

Monday, October 26, 2009

How To: Trade Your Sanity for a Novel in One Month

Well, I haven't been posting as much as I should lately, what with rehearsals and Halloween costume-making and procrastination and such. I haven't even made the things I want to send out to my partners for the shop blog and swap yet, which is horrible! It's proving a lot harder than I thought it would be. But I WILL get them sent out by the end of the month, never fear!

Another thing that's taking up a bunch of my time is preparing for November, which, as some of you may know, is National Novel Writing Month. If you are a writer, but have never been a WriMo, you might want to try it out. It's a month-long writing marathon... goal: 50,000 words. You can't start until midnight, the morning of Nov. 1st, and you must stop at the end of the 30th. It's based on the idea that if you really want to get something done, you need a goal and a deadline. It's crazy, sleepless, productive fun!

For more information, check out the website... http://www.nanowrimo.org

Tuesday, October 13, 2009

Paper Mache Hats...

So for all you crafters out there who have ever thought of making your own top hat out of paper mache...

Don't.

After much recutting and reshaping I finally have the base for my top hat down and it is so ridiculously hard and inflexible. If I wasn't only going to wear it for one night, or if I didn't only have 18 days left to finish my costume, I would completely start over.

That being said, here's a great paper mache resource: http://www.papiermache.co.uk/

Lately I've been getting caught up with "real life", meaning school and the play I'm in and the ever-ongoing job search, mostly. Also my boyfriend took his camera back and I have no clue where mine is, so it's a bit hard for me to do product photos, blog photos, etc. Of course it's his camera, not mine. I need to find my camera... or get a new one...

I made a really cute Halloween necklace last night. It's a candy corn necklace. I'd show you all if I could.

Anyway, sorry for the recent sluggishness and total lack of tutorials. I'll try to get back on the ball. =)

Saturday, October 3, 2009

Good News!

WOW - Such a great day today. So many good things happened!

First, on the way home, I succumbed to temptation and stopped at a yard sale. And I'm glad I did! I got FIVE broken watches for just $2! Can you say steampunk jewelry? And even if I can't come up with anything to make, watch parts go on etsy for like $10! I might actually make some money soon.

Second, I have a contact who can get me a spot in her local craft fair on the first of November... Hallelujah! It seems the universe has heard my prayers... If I can't seem to get a job, at least I can make some money selling my jewelry!

Third... what was third? Oh! I found two bobby pin sets I'd made a while ago and haven't listed yet, and they're ADORABLE. I can't wait to get them up.

AND I found the book I've been looking for, A Feast for Crows, by George R.R. Martin, which is fabulous.

Of course, now that I might be in this craft fair thing I don't know when I'm going to have time to build up a stock for it AND make my Halloween costume... maybe it's a good thing I don't have a job, eh?

I wish you all the same sort of luck I've had today, and better!

Sunday, September 27, 2009

Corset Tutorial and Preliminary Pattern

I used a brown paper bag to make the pattern on, because it was the easiest way to get a large piece of paper. As it was, it wasn't big enough, and I'm going to have to redo the pattern before I test it out with an old sheet to see if it actually fits before doing it in the velvet.

I used a tutorial that I found online after many pages of searching through google. It's pretty good, too, though I did make some changes to the general instructions.

Here it is, for those who are interested.

I'll be writing a tutorial myself, based loosely on this one, but since I need to remake the pattern anyway I figured I would just do it then.

If you're wondering about the front section being so large, it's because the front is going to fold over itself.

Saturday, September 26, 2009

Pictures, as promised

OK, first things first... here is my sketch of the costume.

Obviously, I don't have a wacom tablet and my scanner is broken. But I think you can get the gist of it here...

The corset is black velvet with gold braid, gold buttons, gold fringe, and tails.

The jacket is short and red, with gold epaulets and black velvet cuffs and collar. Gold buttons on the cuffs.

Pants are black, stretchy and fitted, with a stripe of either gold or blue down the side.

Spats end at the top of my calf, and button up the side. They're the best I can do for tall boots. They're black pleather.

Plus a wire form papier-mache'd and covered with cloth for the hat, which is actually fairly close to actual haberdashery, only they have special cloth that they harden with water instead of paper mache. Big difference, ya?


Here's the fabric!~

Black pleather - VELVET - yellow cloth - red for the jacket - stretchy black pants - silky turquoise shirt.


I can't get the true color of the yellow to show up in the photos - it's not this buttery, really. That flower is SO going on my hat.

Friday, September 25, 2009

Thrift Store Bonanza!

OK, first of all, a quick shout-out to my fabulous followers, all TEN of you! I love you all. And I'm so excited that it's in the double-digits! Pretty soon the little box with your pictures might actually be all the way full!

That being said, I'll move on to the main reason for this post. My boyfriend and I changed our minds YET AGAIN about what we were going to be for Halloween. First it was Steve Erwin and Stingray... then it was Gladiator and Lion... and now it's Lion and Liontamer! I'm the liontamer!

And we're definitely sticking with this one, for two reasons: 1: it's too late to change our minds now, I only have a month to make the costumes and 2: the thrift store was having a 60% OFF sale this evening so we bought a bunch of clothes to take apart and use the fabric!

I got a red dress to take apart and use for a short jacket, and another dress with yards and yards of crushed black velvet to make a corset top with tails out of. Then I got some stretchy black pants which I will have to fit to my legs cuz they're WAY too big, and some black pleather pants to cut apart and make into black leather spats cuz I have NO boots.

Also a truly hideous dress with bright yellow fabric and a silky turquoise shirt.

Total cost: around $15. Say it with me: I. Love. Salvation. Army.

I'll post pictures of all my goodies tomorrow, plus a sketch of my costume.

All I have left to buy is gold braid, and something to make the epaulets on the shoulders. That will probably be the most expensive part... I wonder if there's anything I could substitute for gold braid...? I'll check around online.

And of course I'll be documenting the entire costume-making journey on this blog, and telling you how to do everything so you can have a costume as awesome as mine will be too! Stay tuned. =)

Wednesday, September 23, 2009

How to Make Action Figures Into Charms


Ok, this isn't what I planned to write for my next tutorial, but I'm putting a bunch of ninja earrings and necklaces in my shop very soon, so I figured I might as well photograph the process and make it a tutorial!

You will need:
  • A thumbtack
  • A headpin
  • A small action figure, probably rubber or a plastic that isn't too hard or brittle.
  • Glue, if your action figure isn't rubber.
  • Jewelry pliers - it doesn't really matter which kind, even crimping pliers would probably work.


Step One: Get your ninja!


I'm using ninjas in this tutorial... I have them in 8 different colors and 12 different poses. LOL.

Step Two: Find the center of the ninja's head.

You want to find the point that's above the neck, because you want the hole we're going to be poked to poke down into the neck and not to come out under his chin.


Step Three: Poke Him!


Step Four: Poke him again! This time with the headpin. You might need to trim the headpin down a little.

Push the pin in with the pliers.

Step Five: Voila! Admire your new pendant or charm.


If your action figure wasn't made of rubber, which will tighten down over the headpin, glue the headpin in.

This also works great with those cute Japanese erasers!


And the little pop-top containers from the 25-cent machines that the ninjas come in are great packaging for small items!

These are a pair of earrings I just made that I will be listing on the shop as soon as possible. There's a matching ring, too! =D

Shop Swap & Blog

I just signed up for the Shop Swap & Blog, and I had to let everyone know what it is so you all could sign up too!

Shop Swap & Blog

Basically, you send some items from your etsy shop to strangers who have blogs, and they send items from their shops to you, and you all blog about the experience! It's a great way to advertise, get free stuff, and meet new people, all in one fell swoop! (I like the phrase "fell swoop".)

You can do this trade with one or with two people, in your country or internationally. I'm doing it internationally... I hope I get someone from Mexico, I can send some of my Day of the Dead stuff!

You should sign up too! And then comment and let me know you did! ^_~

Incidentally, I found out about this on the lovely EllyBellies blog, here: http://ellybellies.blogspot.com. Go check it out!

Monday, September 21, 2009

Speaking of Eco-Friendly...

This is just a quick post to give a shout-out to epicerma, who has the perfect shop for women who want to take eco-friendliness to the extreme!

Warning: this feature actually acknowledges that women's bodies do different things than the other type. If you can't handle it, skip this post.

How much do we women spend on tampons and pads per year? Far too much! And it's not like any of that is recyclable.

Epicerma has the solution, with her cute cute cute cloth pantyliners and pads. Instead of messing with pads, and throwing away all that paper, plastic, and who knows what else, just pop these in the washing machine and reuse them! Plus, these snap on, which means no sticky backing that doesn't stick, except to the pad itself.

The biggest bonus for me is that these won't make you feel like you're wearing a diaper. I think these would make a great gift to a daughter who's just started her period... they're stylish and much cooler than puffy white maxipads.

Here's my favorite:


Check out her shop
- it's definitely worth a look!

Upcycled Envelope Tutorials (by other crafters)

Tonight I decided that before writing up my tutorial on making envelopes, mailers, and more from the book pages, I ought to check out what others have done that is similar. WOW! There are so many great and different ideas out there on how to make upcycled mailers and envelopes!

I'm still going to write my own tutorial, because I'm sure I'll do a few things differently, but I'll read the tutorials others have written first and if I come across any useful tricks, or if I think up any of my own, I can include those in my tutorial... giving credit where credit is due for other people's tricks, of course.

In the meantime, you really should check some of these out!

Treehugger features several eco-friendly mailer creations from a variety of materials.

Team EcoEtsy shows how to make a waterproof brown paper mailer from old grocery bags!

Whosies has a similar tutorial using contractor's paper.

Trans-Canada Etsy Team
shows how to make mailers from old cereal boxes on their blog!

And finally, 27 Things has a tutorial for DIY bubble mailers that are just beautiful!

Glancing over these, I can see how my ideas are different enough to warrant writing a tutorial or two of my own. So go out and read these, but be sure to check back here to see my own spin on it! =)

Sunday, September 20, 2009

Die Cuts and Yard Sales

Every time I drive into town on the weekends, I pass at least five different signs for yard sales. It's torture! I can just imagine all the broken watches I could take apart and use in steampunk jewelry, or the old books with colorful pages, or interesting jewelry I could take apart, just waiting to be discovered... AND I HAVE NO MONEY!

So go buy something from my shop, before garage sale season is over! LOL.

Aaaand now... as promised... examples of what you can do with book pages!

I went to the local Ben Franklin craft store today... they have two different die-cutting setups, and I make good use of them. =) Here's what I made today...

Over 20 small envelopes like these:


And a lot of these adorable little heart boxes - the PERFECT size for the rings I make!

Saturday, September 19, 2009

How to Take Apart a Book Without Ripping the Pages

This may not seem like the most useful skill right now, but just wait until I put up all the different things you can make with these pages - you won't want to lose a centimeter of the paper to ripping!

Ok, so first step... You Will Need:

A book you no longer want to read
and
A knife. A craft knife is probably best but a kitchen knife will work too... just any knife that's handy.

You can use any type of book, because of course thin paper book pages are useful for decoupage and other crafts, but in this tutorial and others I will be using a book with large, thick, shiny pages... a coffee-table book, essentially.

Ok. If you want to know how to take apart a book, you need to know how it's put together.

If you look at any book that's actually bound, and not just stapled together, and look closely at the paper where it meets the spine, you will see little groups of pages folded in half.

When a book is bound, a certain amount of pages are stacked, sewn down the middle, and folded in half. Then these packets are glued into the spine.

In this picture, the pages on the left have had the insides of the packets removed, leaving only the outer page of the packets, which is glued to the spine.

So step one is to find the packets in your book!

Once you do find a packet, find the inside pages of the packet - the ones not glued to the spine.


Open the book to the front or back of this inner packet, so that one of the pages you're looking at is the one glued to the spine, and one of them is the front or back page of the inner packet.


Taking your knife, run it along the crease where the pages meet.


This will cut the threads that hold the inner packet to the outer pages. It may help if you grip the inner packet and pull with one hand and use the knife with the other. I'd show this in my pictures but I'm using the other hand to hold the camera, lol.


Soon you should be able to pull the inner packet away. Open the inner packet.


The pages in the packet should come apart very easily, as the threads holding them together have already been cut.


Et voila! Beautiful, unripped pages twice as big as if you'd ripped them out!

Coming up next... what the heck to do with them!

Friday, September 18, 2009

Upcoming Tuts

I've taken photos for three new tutorials, and have some photos I can use for a fourth. So keep your eye out for these upcoming tuts:

~Editing product photos without fancy software
~Removing pages from a book without ripping them
~Upcycled envelopes
~Upcycled Good-as-Aanraku bails

Stay tuned, y'all!

Thursday, September 17, 2009

Etsy Listing Tips: Lighting and the Evils of Flash

I link to this tutorial on the etsy forums all the time, so I though I should put it on the new blog:


A recent edition of the email newsletter for Etsy Sellers commented on the evil that is flash, but I would like to expand on why it is evil, and also address the horrors of tungsten lighting and the importance of white balance.

I've photographed a pair of earrings that I made. Because I made them for myself, they are clip-ons. However, if people like them enough, I may remake them and sell them.

We'll start with flash.


Flash vs. Natural Light

OK, the difference is clear. But I'll point a few things out.

In the photo with the flash, the colors are different, and the shadows are harsher. And the photo with flash is actually darker than the photo without! But more than all that - is that the kind of lighting you'd normally see the item in?

Unless the item is something that would normally appear in harsh light - and I can't think of anything that would - don't photograph it using that light.

This does not apply for artistic photography - flash can produce some interesting results by accident or if you know how to use it.

OK. Now to lighting in general.

USE NATURAL LIGHT.

Tungsten is Evil.

Tungsten makes everything orange. Even when using tungsten white balance, the colors are off.

That being said, bright daylight is very bright and will create some pretty harsh shadows. Cloudy days are your friend.

I'm lucky. I have a sort of frosted plastic covering the outside of my window for additional insulation. I always have great photography light.

Windows are your friends. Set up your photos on the windowsill, maybe early in the day when the sunlight isn't as harsh.


White balance is very important as well. Your photos will look blue or orange with the wrong white balance - and you CAN'T rely on auto-white balance. The colors on your items need to be true to life.

Photos taken in tungsten with different white balances:


Big differences, right?


Various white balances in natural daylight:


Once more, a big difference.


The completely blue one is tungsten white balance. Maybe that gives you an idea of how warm tungsten light is. ((shudder))


So pay attention! Bring out the booklet that came with your camera, find out how to adjust the white balance, and then play with it until the results match reality.

I'll be doing more posts like this soon... For my next I plan on talking about the different types of natural light, or maybe how to edit photos without fancy software. Stay tuned!

Tuesday, September 15, 2009

Coming Soon

Ok, we're up and running!

Coming soon:

Tutorials...
~ How to take apart a book without tearing the pages
~ Make your own upcycled bubble mailers! (guess what from)

Etsy Listing Tips...
~ Editing product photos without fancy software
~ Lighting and the Evils of Flash

And more! So stay tuned~

Pepper

Testing...

Test 1 2 3...

(Anything but... that.)